
DATEV Buchungsdatenservice
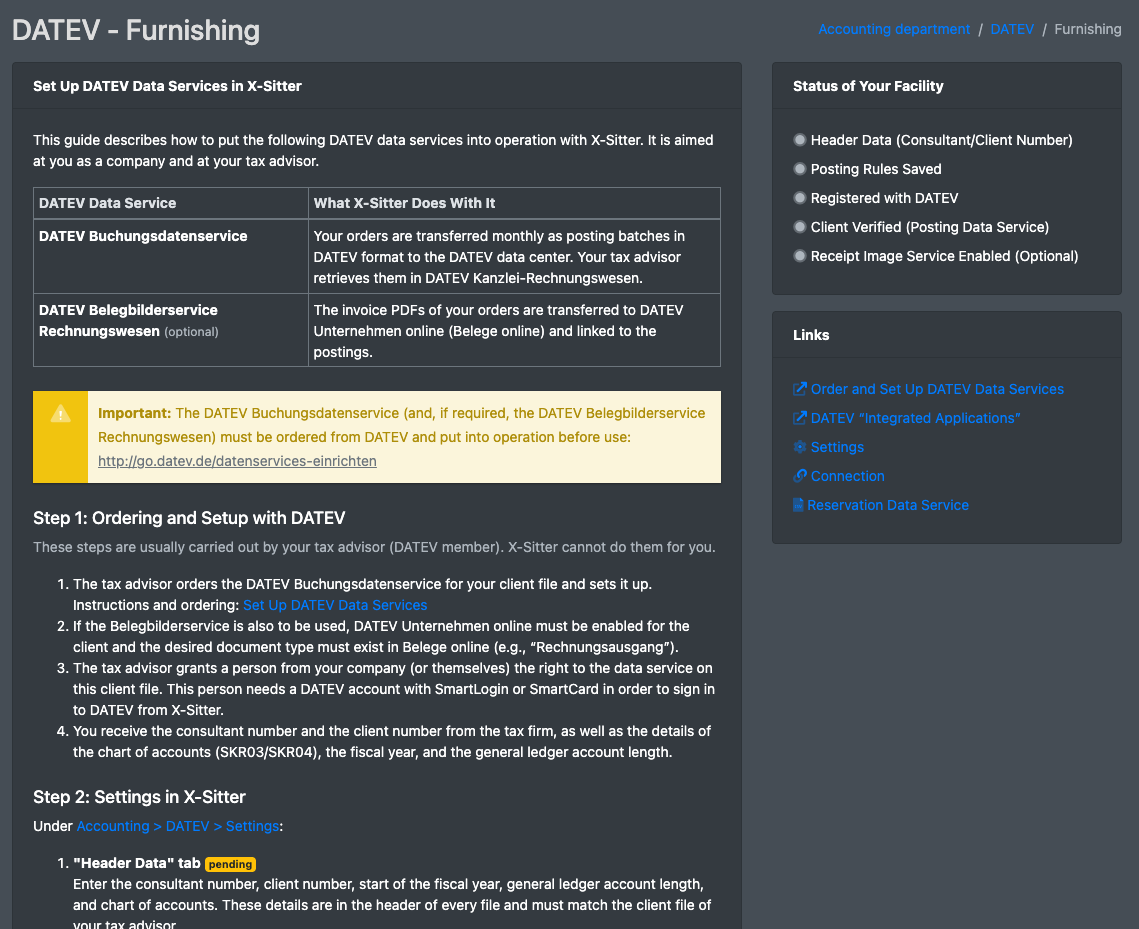
This guide describes how to set up the DATEV data services with X-Sitter. It is intended for you as a company and for your tax advisor. You will find the same guide in X-Sitter under Accounting > DATEV > Setup instructions (German: Buchhaltung > DATEV > Anleitung zur Einrichtung).
warning Important
The DATEV Buchungsdatenservice (and, if required, the DATEV Belegbilderservice Rechnungswesen) must be ordered from DATEV and set up before use: go.datev.de/datenservices-einrichten
Before you start
- Your user needs the permissions for Accounting › DATEV (Buchhaltung › DATEV) and, for the settings, Accounting › DATEV › Settings. Ask your administrator if the menu entries are missing.
- The DATEV connection must be enabled for X-Sitter. If the connection page says Die DATEV-Anbindung ist noch nicht freigeschaltet (the DATEV connection has not been enabled yet), contact X-Sitter support.
- The DATEV connection counts towards the connections of your package, see Billing and package.
Status of your setup
The page Setup instructions (Anleitung zur Einrichtung) shows a checklist of your setup, so you see at a glance what is still missing:
- Header data (advisor/client number) (Kopfdaten (Berater-/Mandantennummer))
- Posting rules saved (Buchungsregeln gespeichert)
- Logged in to DATEV (Bei DATEV angemeldet)
- Client checked (Buchungsdatenservice) (Mandant geprüft (Buchungsdatenservice))
- Belegbilderservice activated (optional) (Belegbilderservice aktiviert (optional))
Step 1: Ordering and setup at DATEV
These steps are usually carried out by your tax advisor (DATEV member). X-Sitter cannot do them for you.
- The tax advisor orders the DATEV Buchungsdatenservice for your client file and sets it up: Setting up DATEV data services.
- If the Belegbilderservice is to be used as well, DATEV Unternehmen online must be activated for the client and the desired document type (e.g. "Rechnungsausgang") must exist in Belege online.
- The tax advisor grants a person from your company (or themselves) the right to use the data service on this client file. This person needs a DATEV account with SmartLogin or SmartCard to log in to DATEV from X-Sitter.
- The firm gives you the advisor number (Beraternummer) and the client number (Mandantennummer) as well as the chart of accounts (SKR03/SKR04), the financial year and the length of the general ledger account numbers.
Step 2: Settings in X-Sitter
Under Accounting > DATEV > Settings (Buchhaltung > DATEV > Einstellungen):
- "Header data" tab (Kopfdaten): enter the advisor number, client number, start of the financial year, length of the general ledger accounts and the chart of accounts. These details are in the header of every file and must match your tax advisor's client file.
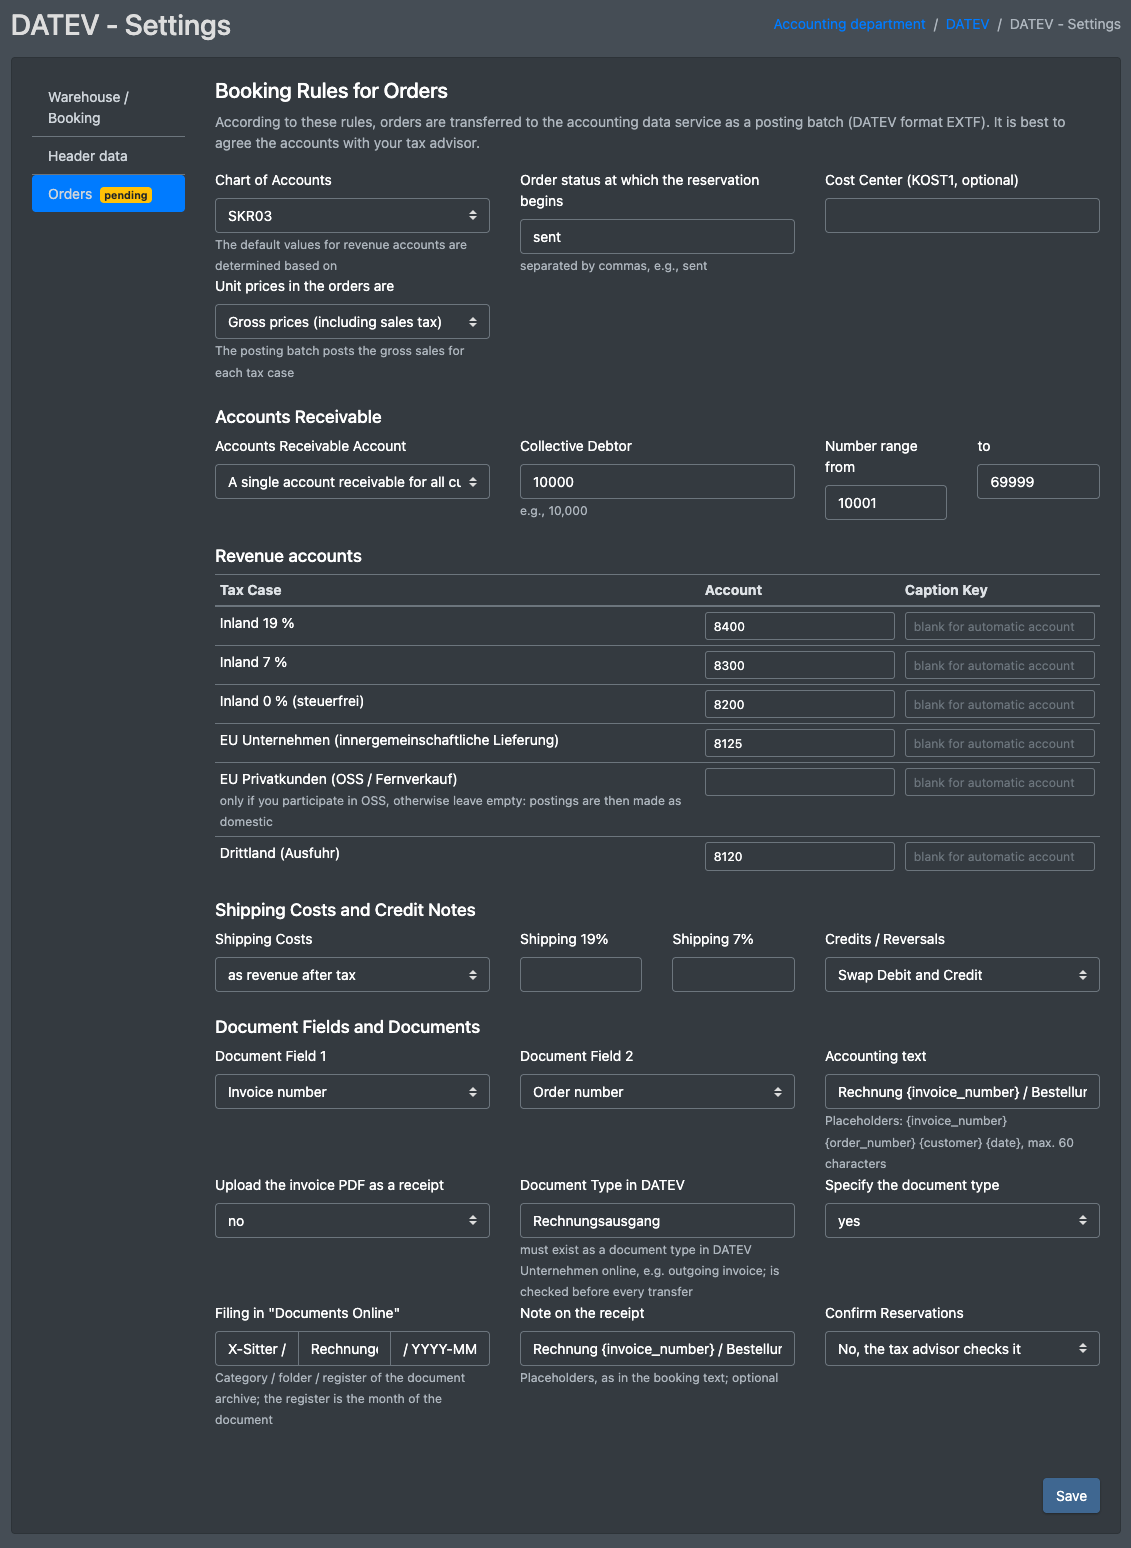
- "Orders" tab (Bestellungen): the posting rules – chart of accounts, debtor account (collective debtor or one account per customer), revenue accounts per tax case (domestic 19 %, 7 %, tax-free, EU businesses, EU consumers, third countries), handling of shipping costs and credit notes, document fields and posting text, from which order status orders are posted and whether invoice PDFs are transferred as documents. Agree the accounts with your tax advisor and save the rules. Without saved rules no posting batch is created.
- Click Save (Speichern). X-Sitter confirms with The data has been saved (Die Daten wurden gespeichert) and keeps the tab you last worked on open. As long as the posting rules have never been saved, the "Orders" tab is marked open (offen).
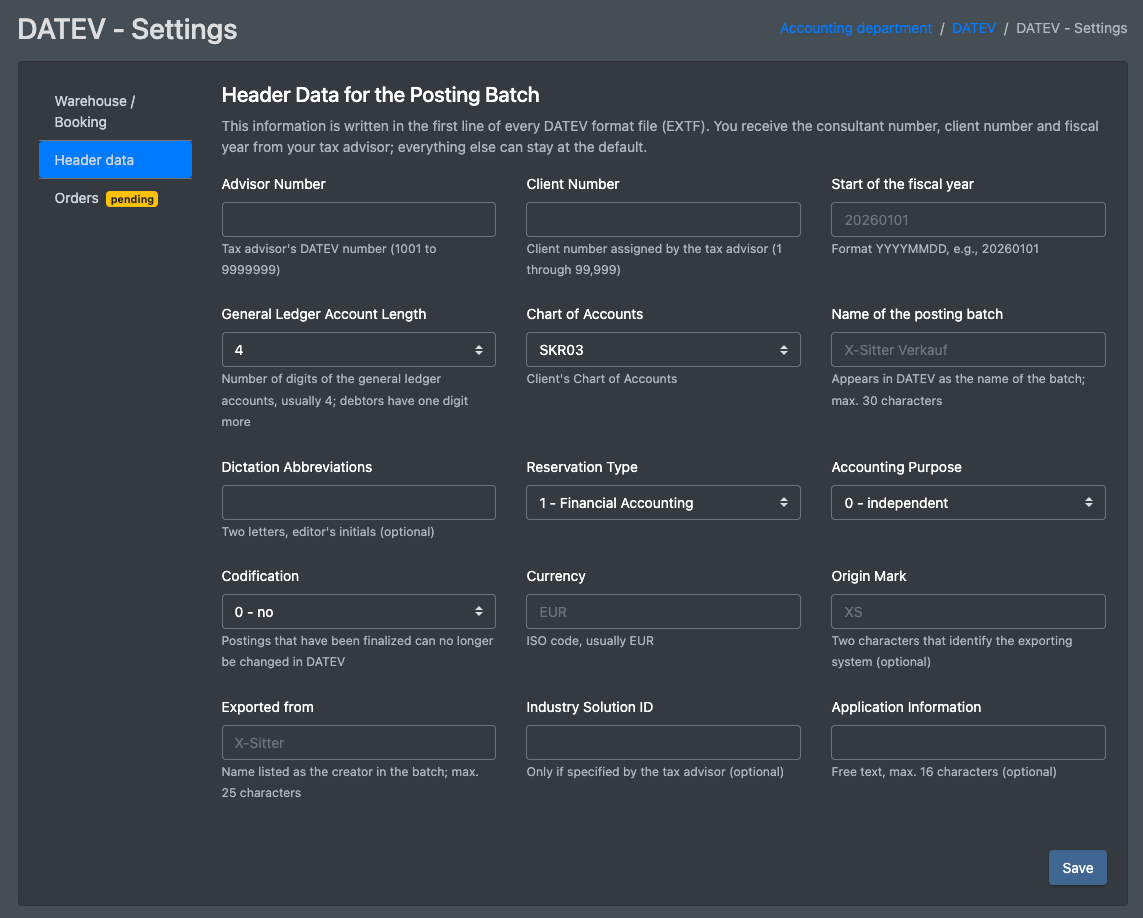
Header data – fields
Posting rules ("Orders" tab) – fields
Step 3: Connect to DATEV
Under Accounting > DATEV > Connection (Buchhaltung > DATEV > Verbindung):
- Click "Connect to DATEV" (Mit DATEV verbinden). You are redirected to the DATEV login page and log in there with your DATEV account (SmartLogin app or SmartCard). DATEV shows you which access X-Sitter requests; confirm it.
- Back in X-Sitter, choose the client from the list ("review and select", prüfen und auswählen). Only client files your DATEV user has access to are listed; only files for which the Buchungsdatenservice is set up can be selected. If there are many files, filter by advisor and client number.
- The connection status shows "connected" (verbunden) as soon as DATEV has confirmed access to the client. It also shows who established the connection and until when access is valid. With the permanent connection, access is automatically extended by two years with every use.
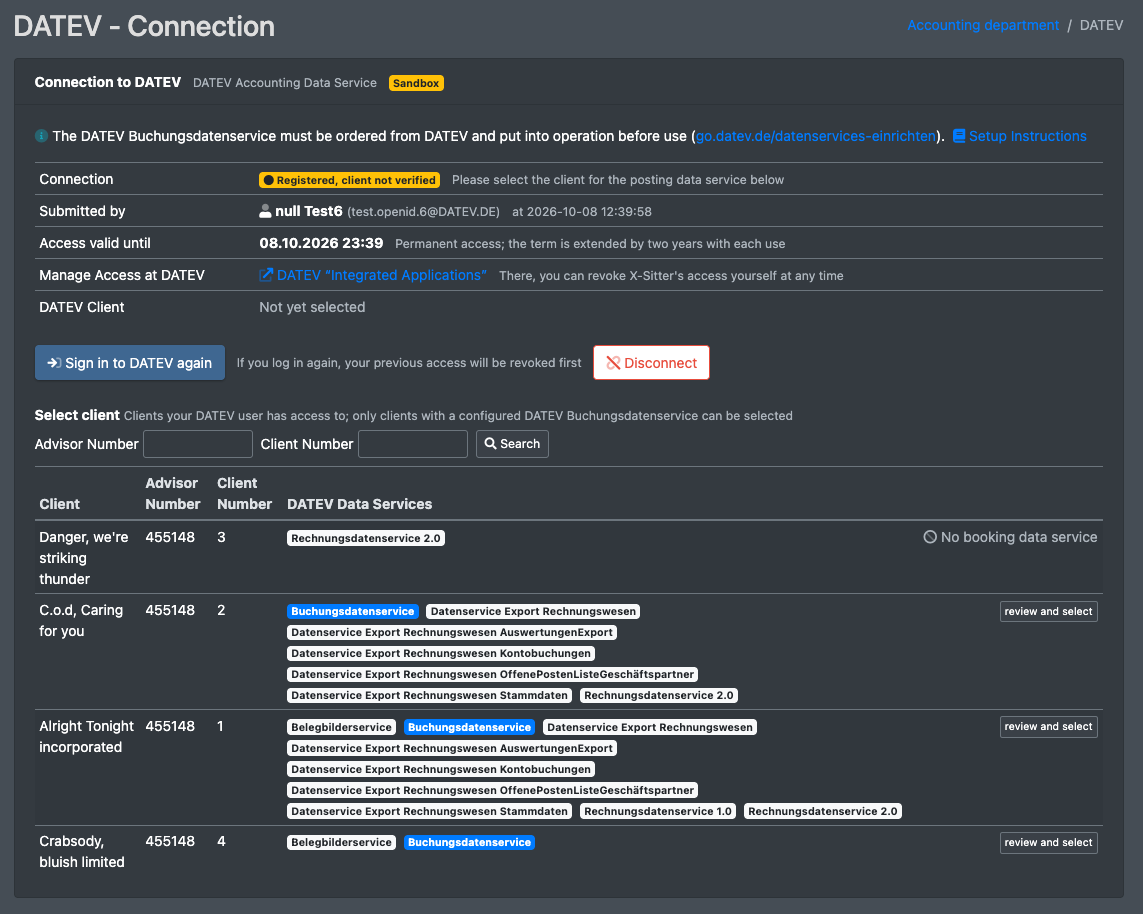
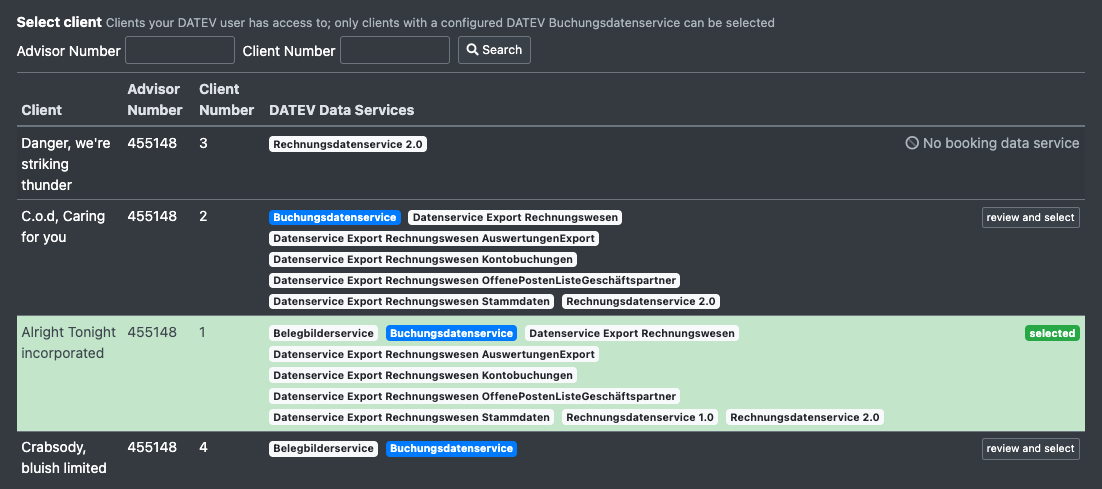
Good to know about the connection:
- Access type: Dauerzugriff (permanent access) is extended by two years with every use. Kurzzeitzugriff (short-term access) is valid for 11 hours; after that you have to log in again.
- The DATEV login must be completed within 15 minutes. If you take longer or cancel, start again with Connect to DATEV.
- "Sign in to DATEV again" (Erneut bei DATEV anmelden) first revokes the previous access and then starts a new login, e.g. when a different person should hold the connection.
- If you are a client of a logistician, the connection may be provided by your logistician. The connection page then shows Die Verbindung wird vom Logistiker bereitgestellt (the connection is provided by the logistician).
Step 4: Transfer posting batches
Under Accounting > DATEV > Buchungsdatenservice:
- Choose a month. The preview shows all orders of the month with the configured order status that have not been transferred yet, with gross amount and notes (e.g. missing revenue account, different currency).
- "Create posting batch" (Buchungsstapel erzeugen) creates the file in DATEV format. You can download it and have it checked beforehand with the DATEV checking program or by your tax advisor.
- "Submit to DATEV" (An DATEV übermitteln) first sends the documents (if enabled) and then the posting batch to the DATEV data centre. DATEV then processes the file; the status is queried after the waiting time stated by DATEV.
- Only when DATEV reports "accepted" (angenommen) is the batch considered transferred. The orders it contains are then no longer offered, so nothing is posted twice. If DATEV rejects the file, you see the error message on the batch; the orders are then free again for a new batch.
- Your tax advisor finds the batch in DATEV Kanzlei-Rechnungswesen under the provided posting data; linked documents are in Belege online in the folder "X-Sitter".
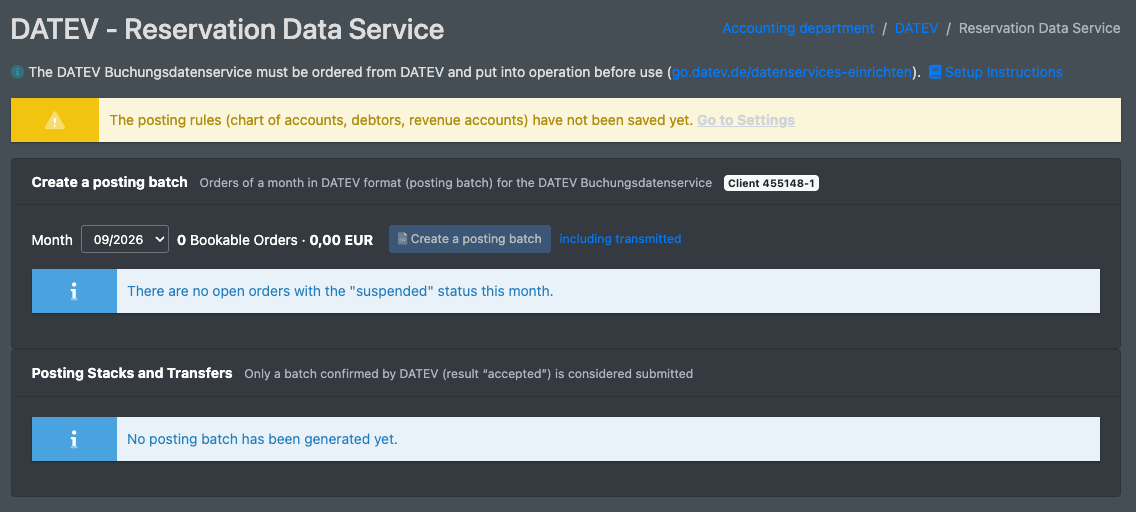
Details on the transfer
- Month (Monat): you can choose one of the last 18 months; the previous month is preselected.
- Preview columns: date, order number, invoice number, customer, country, channel, gross, postings, document and note. Orders without an invoice PDF are posted without a document link (kein Rechnungs-PDF, Buchung ohne Beleglink).
- Download EXTF file (EXTF-Datei herunterladen): downloads the created batch so you or your tax advisor can check it before sending.
- Discard a batch: a batch that has not been transferred yet can be discarded (Buchungsstapel verwerfen? → Ja, verwerfen). Its orders are then free again.
- Submit: confirm the dialog with Yes, submit (Ja, übermitteln).
- Check status (Status prüfen): after the waiting time stated by DATEV, query the result. Open batches are also queried automatically once when you open the page.
- If a document upload fails, the posting batch is not sent.
- A rejected batch cannot be sent again. Fix the cause (see the DATEV message), then create a new batch.
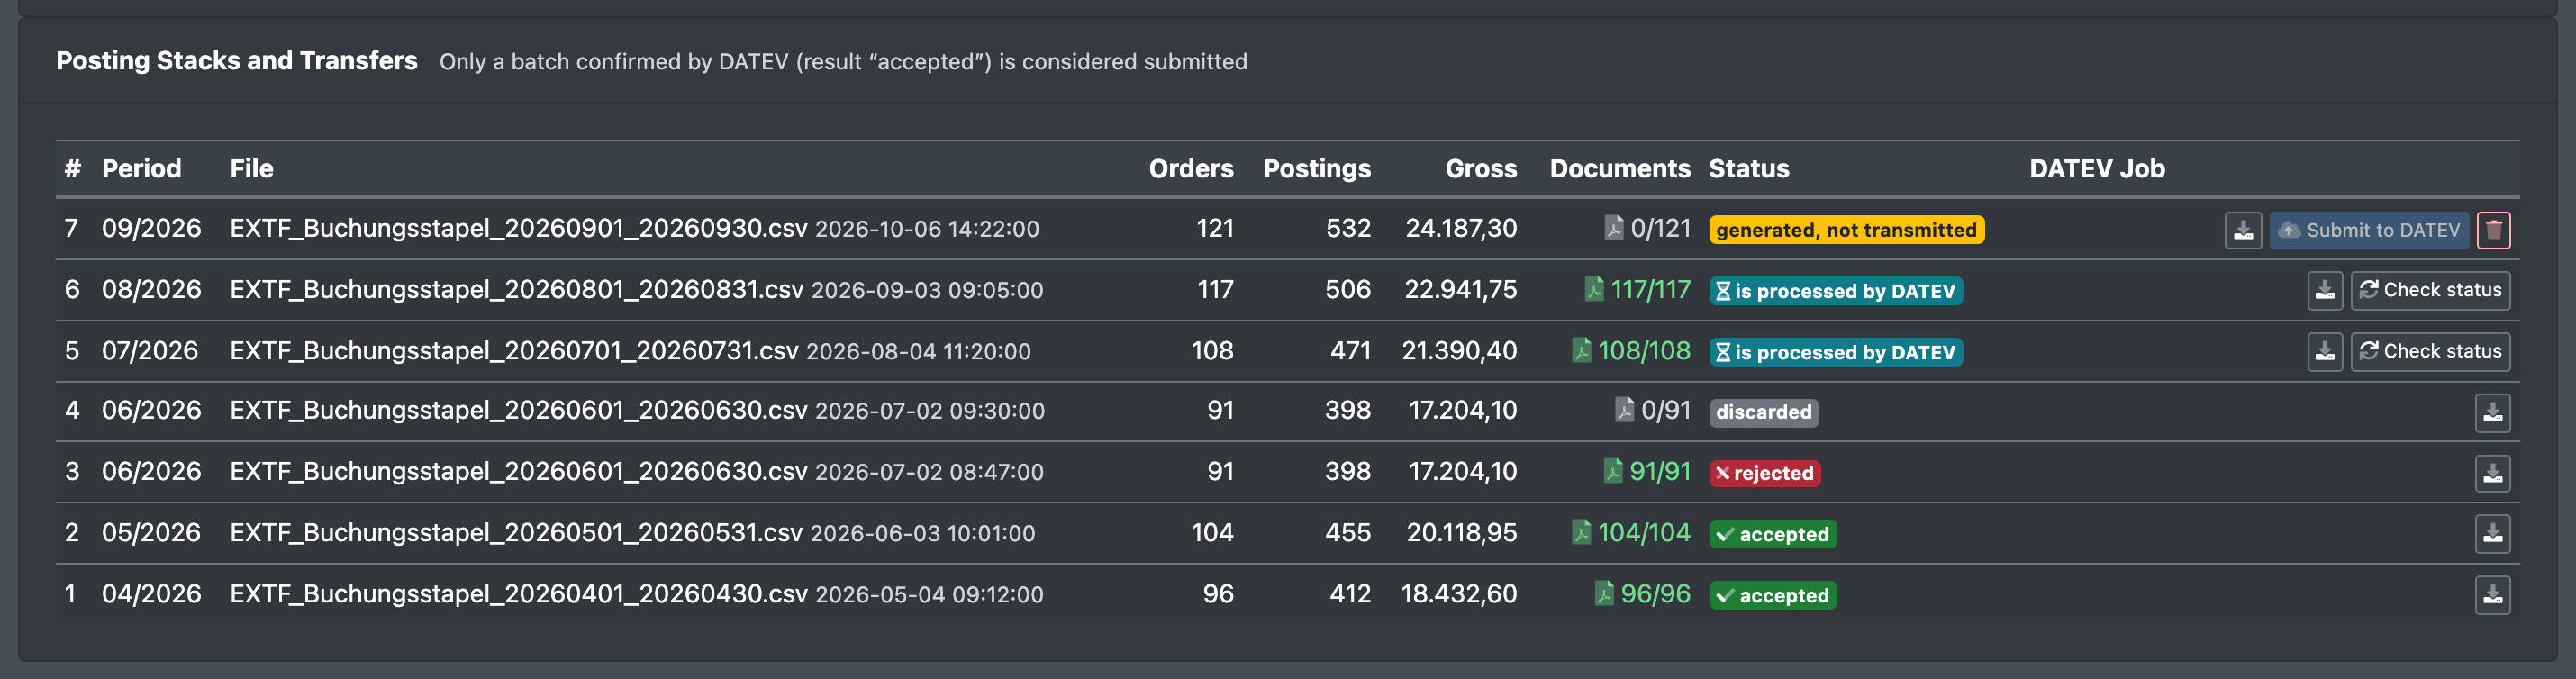
Batch statuses
X-Sitter can also notify you about rejected transfers or an expired DATEV connection via Telegram (notification DATEV - Fehler), see Telegram notifications.
Disconnect or check access
- "Disconnect" (Verbindung trennen) on the connection page deletes the credentials in X-Sitter and revokes access at DATEV.
- You can see and revoke at any time which applications may access your DATEV data in the DATEV application "Verbundene Anwendungen".
If something does not work
- Error messages from DATEV usually contain a link to the DATEV help; X-Sitter shows it directly in the message.
- No client file with Buchungsdatenservice can be selected: the data service has not been ordered or set up for the file yet, or your DATEV user does not have the right for it. Please contact your tax advisor.
- DATEV reports that the document type does not exist: the document type entered in the settings must exist in Belege online, or switch off "Specify the document type" (Belegtyp mitgeben).
- For all other questions about the connection, contact X-Sitter support via Create ticket (Ticket erstellen) in the footer of X-Sitter. We clarify technical questions with DATEV without you having to contact DATEV yourself.
- Do you work with the Dutch accounting software SnelStart instead? See SnelStart.